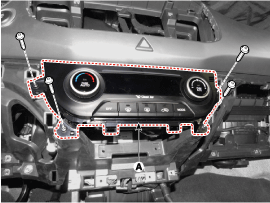
Hyundai Creta: Controller / Heater & A/C Control Unit (DATC)

Components and components location

Components

Connector [A]
Pin NO
Function
Pin NO
Function
1
Battery (+)
21
IGN1
2
IGN2
22
ILL+ (TAIL)
3
Detent Out (-)
23
EVAP Sensor (+)
4
Sensor REF (+5V)
24
AMB Sensor (+)
5
Mode actuator feedback
25
-
6
Mode actuator (Vent)
26
Photo sensor (-)
7
Mode actuator (Defrost)
27
Blower motor (+)
8
Temperature actuator feedback
28
Power mosfet (Gate)
9
Temperature actuator (Cool)
29
Power mosfet (Drain feed back)
10
Temperature actuator (Warm)
30
HTD (Rear defog indicator)
11
Intake actuator feedback
31
Rear defog switch
12
Intake actuator (Fresh Air)
32
ADS Signal
13
Intake actuator (Recirculated Air)
33
-
14
Defogging actuator feedback
34
C_CAN High
15
Defogging actuator (Open)
35
C_CAN Low
16
Defogging actuator (Close)
36
ECV +
17
-
37
ECV- (Ground)
18
Cleean signal
38
ILL- (RHEO)
19
Ionizer diagnosis
39
Sensor ground
20
Ground
40
Ground

Repair procedures

Self Diagnosis
1.
Self-diagnosis process.

  
When operating the self-diagnostics, the below fault (self-diagnostics code) will blink at 0.5 seconds interval on the temperature display settings (driver's side only) and the remaining symbols are OFF .
2.
Fault code display
(1)
Continuance operation : DTC code.

(2)
Continuance operation : DTC code.

(3)
STEP operation.
A. Nomal or one fault code is same as a continuance operation.
B. DTC code.

3.
If fault codes are displayed during the check, Inspect malfunction causes by referring to fault codes.
Display
Fail description
0
Normal
11
Incar sensor OPEN
12
Incar sensor SHORT
13
Ambient sensor OPEN
14
Ambient sensor SHORT
17
Evaporator sensor OPEN
18
Evaporator sensor SHORT
19
Driver temp door potentionmeter OPEN or SHORT
20
Driver temp door potentionmeter Error
21
Mode door potentionmeter OPEN or SHORT
22
Mode door potentionmeter Error
23
Auto defog sensor open
24
Auto defog sensor short
25
Intake door potentionmeter OPEN or SHORT
26
Intake door potentionmeter Error
43
Defog door potentionmeter open or short
44
Defog door potentionmeter error
45
APT CAN Signal Error
47
RPM CAN Signal Error
48
Vehicle speed CAN Signal Error
49
Engine coolant temprature CAN Signal Error
50
Cluster ionizer fault
71
ECV Fault

4.
Fail safe
NO
Item
Fault
Fail Safe
1
Incar sensor
Open or Short
Control with the value of 25 °C (77.0 °F)
2
Amblent sensor
Open or Short
Control with the value of 20 °C (67 °F)
3
Evaporator sensor
Open or Short
Control with the value of -2 °C (28.4 °F)
4
Mode door potentiometer
Open or Short
Fix vent position, while selecting vent mode.
Fix defrost position, while selecting all except vent mode.
Fix vent position, while selecting IG ON → OFF.
Fix defrost position, while selecting floor purge.
5
Temperature door potentiometer (DATC)
Open or Short
If temperature setting 17 °C (62.6 °F) ~ 24.5 °C (76.1 °F), fix at maximum cooling position.
If temperature setting 25 °C (77 °F) ~ 32 °C (89.6 °F), fix at maximum heating position.
6
Intake door potentiometer
Open or Short
Fix FRE position, while selecting FRE mode.
Fix REC position, while selecting REC mode.
7
Engine RPM
FFh or NO reception
Control with the value of 0 RPM
8
Vehicle speed
FFh or NO reception
Control with the value of 0 km/h
9
Engine coolant temperature
FFh or NO reception
Control with the value of - 2 °C(28.4 °F)
10
APS
FFh or NO reception
Control with the value of 0%
11
R-TQACNAPVC
(Max Torque limitation of A/C Compressor)
FFh or NO reception
A/C OFF (Control with the value of 0 Nm)
12
R-PACNC
(APT Sensor Output Value)
FFh or NO reception
A/C OFF (Control with the value of 0 hpa)
13
RLY-AC
(Activation of air conditioner compressor relay)
FFh or NO reception
A/C OFF

Replacement
1.
Disconnect the negative (-) battery terminal.
2.
Remove the crash pad center panel.
(Refer to Crash Pad - "Crach Pad Center Panel")
3.
After loosening the mounting screws, remove the A/C & heater controller unit (A).

4.
Disconnect the connector (A) and the air hose (B).

5.
Install in the reverse order of removal.
  
Make sure the connector are connected in properly.
Replace any damaged clips.
Heater & A/C Control Unit (Manual)
Components and components location Components Connector [A] Pin NO Function Pin NO Function 1 Low ...

Other information:

Hyundai Creta GS 2014-2024 Service Manual: Description and operation
Description The ECM (Electro Chromatic inside rear view Mirror) is intended dim the reflecting light in the rear view mirror. The forward facing sensor detects brightness of the surroundings, while the rearward looking sensor is for the light from the rear. The strength of t ...

Hyundai Creta GS 2014-2024 Service Manual: Front Mud Guard: Repair procedures
Replacement    • Put on gloves to protect your hands.    • When ...

© 2017-2024 www.hcrmangs.com